Remote Desktop network printer redirection workaround
On your Local Computer
- Click on the Start button and open Control Panel then open “Devices and Printers”
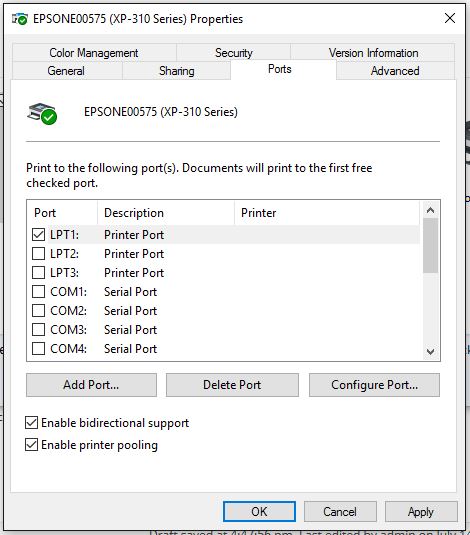
- Right click on the network printer that needs to be redirected and choose “Printer Properties”
- Click on the Ports tab and put a check next to “Enable printer pooling” and next to the “LPT1:” in the list then click the OK button to finish.
- Click on the Start button and open Remote Desktop Connection then click on the “Local Resources” tab.
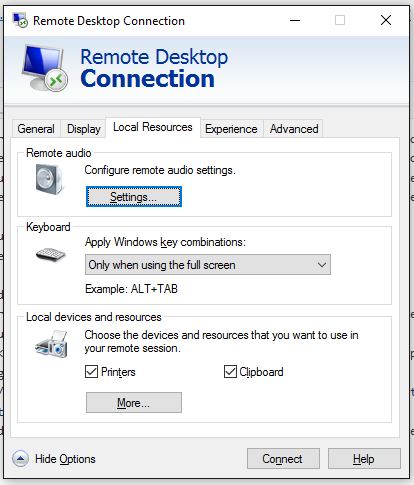
- Click on the “More…” button at the bottom then put a check next to the Ports item then click the OK button.

- Make sure to go back to the General tab and click on save before clicking on the Connect button.
- Once connected download and install the needed print driver but do not create the printer itself yet.
On the RDP Server
- Inside the Remote Desktop connected computer you first need to install the drivers for the printer you are trying to connect, you should be able to download them and install them from the manufacturers website.
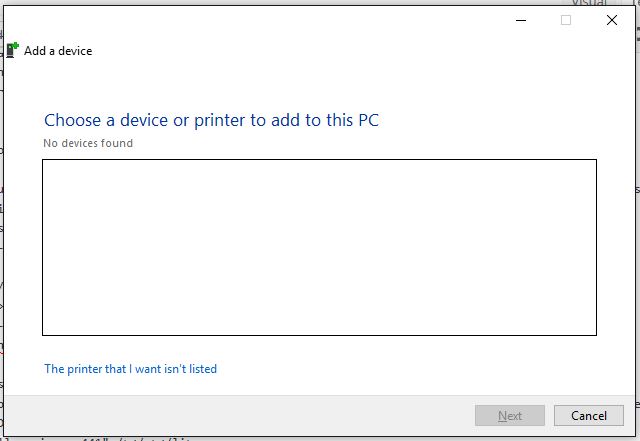
- Once the drivers have been installed, click on the Start button and open Control Panel then open “Devices and Printer”
- Click on the Add Printer button at the top then click on the “The printer that I want isn’t listed” link at the bottom of the window that opens.
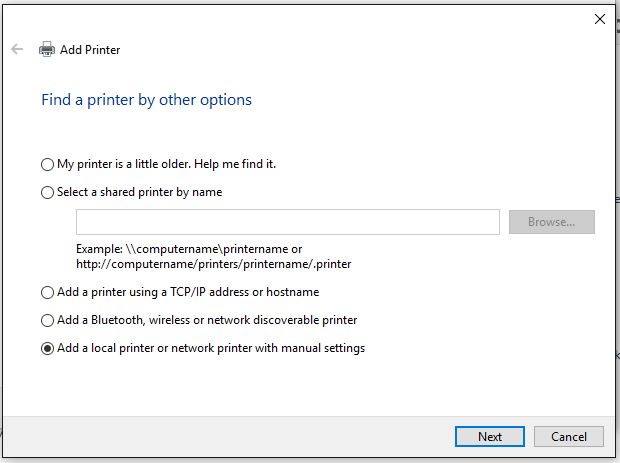
- Click on the radio selection next to “Add a local printer or network printer with manual settings” then click on the next button.
- Click on the list “Use an existing port” and choose “TS001:” which usually corresponds to the LPT1: port redirection, but it may take some trial and error going through this list later to figure out which one it is.
- Search through the list of drivers to pick the one associated with the one being connected then click on the Next button.
- If requested, choose to “Replace the current driver” and click on the Next button.
- Change the name as needed and click on the Next button.
- Choose “Do not share this printer” and click on the Next button.
- Test the printer by clicking on “Print a test page” then click the Finish button.
If the printer does not print then open the printer properties on the Remote Desktop connected computer and change the port to TS002: on the Ports tab, click Apply then click “Print a test page” on the General tab to test again. Repeat down the list until the correct port is found.
|  My Account
 Service Status
 Help Center


